Ribbed Striped Scarf
Ribbed Striped Scarf
To buy an ad free PDF on Ravelry click here
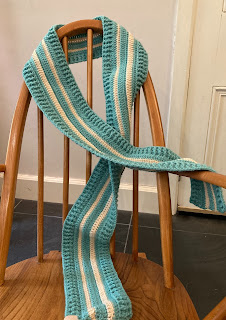
I had some left over DK wool after designing my Adult ribbed bobble hat so I thought I would make a scarf to match. I wanted to have long stripes for easy colour work and to give it a long, flowing feel. This scarf can be easily adapted to suit you as you can make it as long or short as you wish. I have just put how many stitches I used but it can easily be shortened to make a great kids scarf or longer if you like to be able to repel down a second story window using it! The use of the textured ribbing and front and back loop crochet makes it a very soft and squishy scarf. I haven't made it too wide because I sometimes find very wide scarves too bulky with my fitted jackets.
This is a great project that you can just get going and not think too much about. It is also good for a beginner who wants to try using more textured stitches in their work and wants a project that they can work up quickly and wear anytime.
Wool: Any soft DK acrylic or wool blend
100g ball colour A
100g ball colour B
Hook: Crochet hook 4.5 mm
Other essential items: Yarn needle
Tension: 20 stitches in 10cm
Finished scarf measures approximately 176 cm x 12 cm
Stitch abbreviations UK terms
ftr-Foundation treble crochet
blo-Back loop only
flo- Front loop only
rtrf-Raised treble front
rtrb-Raised treble back
Row 1: 320 ftr, turn
Row 2: ch3, [1 rtrf, 1 rtrb] repeat to end with last treble into the top of the final ftr of Row 1, turn
Row 3, 4: ch3, [1 rtrb, 1 rtrf] repeat to end with last treble into the top of the ch 3 of Row 2, turn
 |
| Texture detail |
NOTE: The ribbed edging to this scarf means you keep to the same stitch for these rows so in the previous row you did a raised treble front you will also do it in the current row. This will mean your stitches line up. If you alternate between rows it will have a very different effect.
Row 5: ch3, tr blo in each stitch until the end with tr in the top of ch3 and changing to colour B, turn
Row 6: ch 3, tr flo in each stitch until the end with tr in the top of ch3 and changing to colour A, turn
Row 7: ch3, tr blo in each stitch until the end with tr in the top of ch3, turn
Row 8: ch 3, tr flo in each stitch until the end with tr in the top of ch3 and changing to colour B turn
Row 9: ch3, tr blo in each stitch until the end with tr in the top of ch3 and changing to colour A, turn
Row 10: ch 3, tr flo in each stitch until the end with tr in the top of ch3, turn
Row 11: ch 3, tr in each stitch until the end, turn
Row 12: ch 3,[1 rtrf, 1 rtrb] repeat to end with tr in top of ch 3, turn
Row 13: ch3, [1 rtrb, 1 rtrf] repeat to end with last treble into the top of the ch 3, turn
Row 14: Repeat Row 12, fasten off and weave in ends
To buy an ad free PDF on Ravelry click here
If you don't know how to do a foundation treble then watch my quick video...
Need a little help with the Raised Treble Front and Raised Treble Back? Here is a video I made!


Comments
Post a Comment